WordPress Shortcodes
Last updated 02/29/2024
For your convenience, we’ve created several WordPress shortcodes to make it easy to implement our functionality on your site. Check out the shortcodes below to see how they work, and how they can help you improve conversions.
To add a shortcode, follow these steps:
- Find the page or post where you want the tool to appear, and open it in Edit mode in WordPress.
- Place the cursor at the place in the page where you want to add the tool. For tools that aren’t inline on the page, you can put the shortcode anywhere.
- Click the Toggle block inserter button, then search for and select Shortcode.
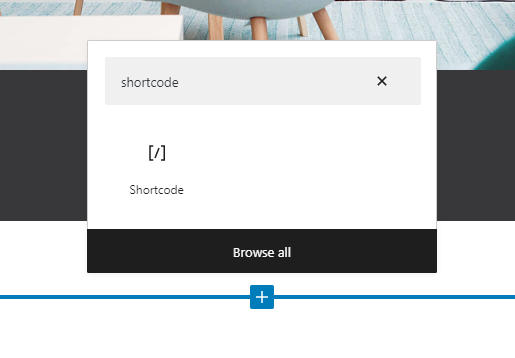
- In the shortcode block, enter the shortcode for any of the tools below.
‘Continue with’ auto launch on page load
You can configure the ‘Continue with’ tool to appear on page load via the page settings in WordPress, but you can also do it with the following shortcode:
[breadbutter-continuewith]Supported Parameters:
| callback_url | [STRING] The Callback URL is the URL that the user will be redirected to after they have authenticated with the provider. Please add your Callback URL by going to “Settings” in the left menu of your Bread & Butter app, and expand “Advanced Settings”. Note that “Enable Callback URL” will need to be set to ON. |
| destination_url | [STRING] The Destination URL is the final destination for the user to be redirected. Use this if you want the user to end up on the same page, or a specific different page after authentication. |
| client_data | [OBJECT] Client data is used to allow you to pass parameters from the client side to your backend which processes the authentication. |
| button_theme | [STRING] [VALUES: round-icons/tiles] [DEFAULT: ’tiles’] This parameter allows you to change the theme the provider buttons are displayed. |
| expand_email_address | [BOOLEAN] [DEFAULT: true] This parameter sets whether the email address field is visible on page load, or must be expanded to be visible. |
| show_login_focus | [BOOLEAN] [DEFAULT: false] Show the Blur Screen Prompt |
| continue_with_position | [OBJECT] [Example: {‘top’: ’10px’, ‘right’: ’10px’}] Used for positioning the ‘continue with’ tool. Will accept only 1 parameter for top/bottom and 1 parameter for left/right. Accepts 10, ’10px’, and ‘10%’ for positioning. |
| success_event_code | [STRING] When authentication is a success, a custom user event will be triggered with this custom event code. Event definition must be created in the Webapp first. |
| show_logged_in_profile | [BOOLEAN] [DEFAULT: true] The ‘Continue with’ is replaced by the Profile tool, when a user is signed in. The Profile tool includes a sign out button. |
| hide_verified | [BOOLEAN] [DEFAULT: true] Hide the ‘Continue with’ tool for returning users. Should be used when you don’t want to keep prompting returning users to authenticate. |
| delay_seconds | [INT] The number of seconds after page load that the ‘Continue with’ appears. |
Logout button
Add a simple logout button to any location on your website. When clicked, users will be logged out of your WordPress site, and their authentication status with Bread & Butter will be reset. Add the following shortcode:
[breadbutter-logout-button]‘Sign up / Sign in’ tool on a page
You can easily add the ‘Sign up / Sign in’ tool to a menu item by following these steps, but you can also add it directly to any page using this shortcode:
[breadbutter-profile-widget]Newsletter tool on a page
The standard Newsletter sign up tool appears over top of the page, and can be configured directly in your WordPress settings, but you can also embed it directly on a page using this shortcode:
[breadbutter-newsletter]Or you can make it appear from a button click:
[breadbutter-newsletter-button]button[/breadbutter-newsletter-button]Where “button” is the display label of the button (you can set this to anything).
User event from a button click
You can quickly and easily add a button to your page that creates a user event when clicked:
[breadbutter-customevent-button css_class="custom" event="your_event"]button[/breadbutter-customevent-button]Where “button” is the display label of the button (you can set this to anything). You need to specify the event code (See the User Events page for more details), and you can also optionally apply your own CSS to the button.
Additionally, you can specify a callback function, or a redirect URL for the button:
[breadbutter-customevent-button css_class="custom" event="your_event" redirect="http://www.yoursite.com/page"]button[/breadbutter-customevent-button][breadbutter-customevent-button css_class="custom" event="your_event" callback="runFunction"]button[/breadbutter-customevent-button]Note: you cannot use both the callback and redirect parameters in the same shortcode. You can only use one or the other.
Contact Us from a button click
Launch the contact us dialog from a button anywhere on your site:
[breadbutter-contactus-button css_class="custom"]button[/breadbutter-contactus-button]Where “button” is the display label of the button. You can also optionally specify a CSS class to style the button itself.
User Event created on page load
Add this shortcode to any page, and the specified event will be created for the user when they visit the page:
[breadbutter-customevent event=event_code /]Specify the event code from the user event setup in the Webapp.
Don’t use Bread & Butter? Want to learn more about how Bread & Butter solves the four biggest problems facing marketers today? Book a demo and see how Bread & Butter is helping marketers make the most of their first-party data


Seeing changes in your match rates? With the end of third-party cookies & new regulations on how data can be shared (GDPR, CCPA or Data Protection Laws), what are you doing to make sure you aren’t caught out?
FUTURE PROOF YOUR DATA - LEARN MOREAdd authentication & API event tracking to your website/app with a script tag & configuration